Update (11.11.2020): There are new versions available/announced on the stabilizer-pro website – Xphase Pro S2 and X2.
Please find more information on the supplier’s website and stay tuned for further updates. X2 should be available from 26th April 2021.
INTRO
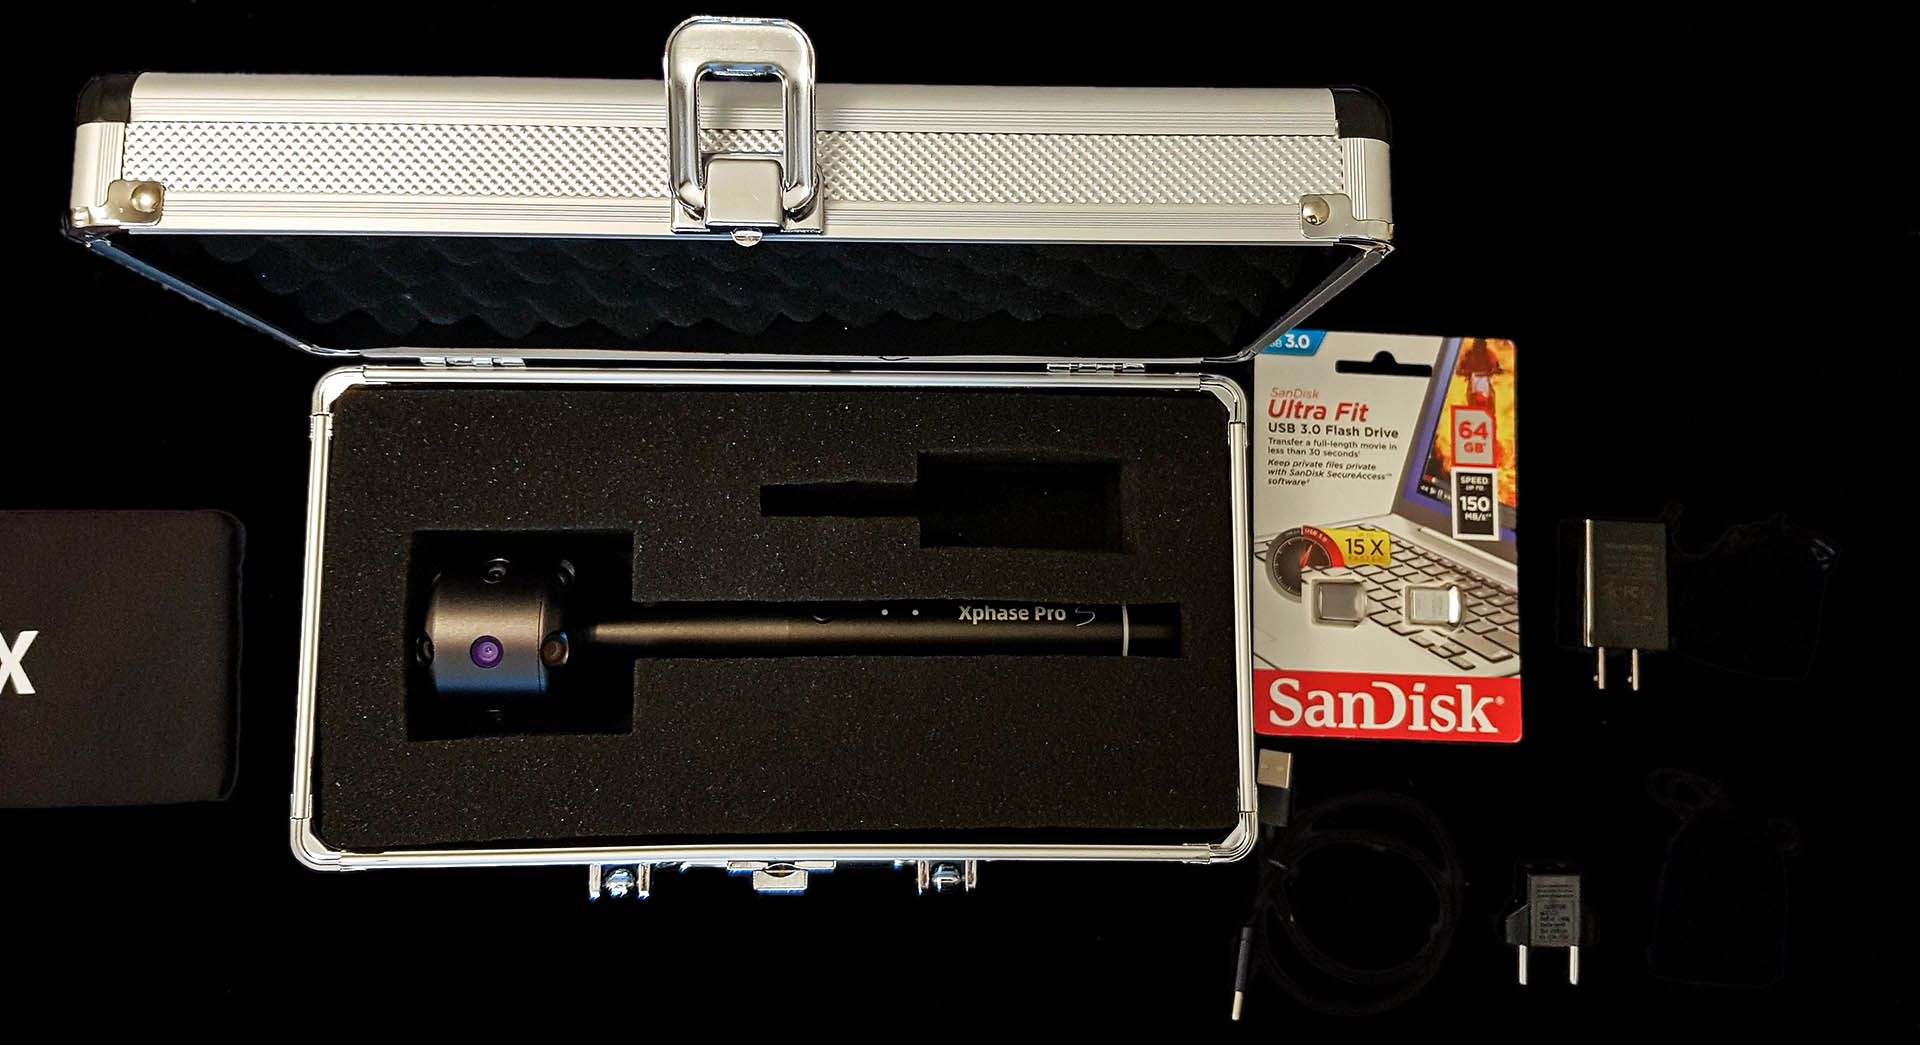
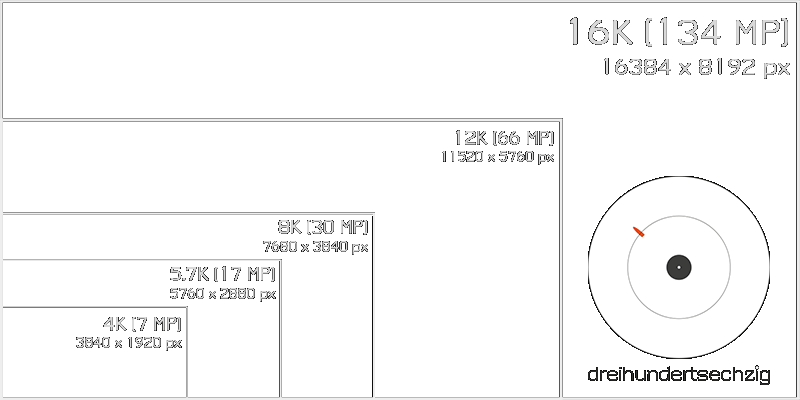
The Xphase Pro S is a 360° one-click camera, that can capture 200 Megapixels in total (with an ready stitched output of 134 MP, 16K on a smartphone or PC/MAC). It works with 3 or 6-shot HDR and it’s own file format „ORI“, where the single pictures from all 25 sensors (3/6 each) are saved. There is no preview, but direct stitching to smartphones available (JPG/PNO only). Stitching is easy and surprisingly good with their own software/app for PC and MAC. The possibilities with this nice tool seem endlessly, but the system is still in an quite early state. At the moment i can only reccomend it to experienced photographers, who are willing to spend some time with it and can evaluate the up-/downsides. A full RAW workflow is neccessary to get the most stunning results out of it.
How does the Xphase basically work?
You press the shutter (via camera button or smartphone app) – the camera takes three or six exposures (3HDR/6HDR) from all 25 sensors/lenses right after another to the RAM. Those are saved as „single lens“ JPGs inside a container file (ORI format), together with other information (like stitching calibration, GPS if used, gyro information, shooting settings/metadata), on the USB thumb drive. You can stitch those ORI files to PNO (Xphase own format for viewing stitched panos inside their apps), JPG, 16-bit PNG and RAW DNG. When stitching, the 75 or 150 single lens shots will be HDR merged and stitched to a 16384 x 8192 pixel 360 x 180° equirectangular panorama.
As there still are smaller and some major issues with the hard- & software, please check the Facebook group for the actual status of development. I will add more information to this article over time. For now, you’ll find some basic and also more technical information below.
INDEX/OVERVIEW
Where to buy?
Initial Set-Up & Begin Shooting with the XPhase Pro S (tbc)
Review, Samples, Workflow & Tutorial from 360 Rumors
Facebook Group/Board/Community („XPhase / XPhase Pro Group“)
Firmware/Software & User Guides
Version History (last updated 2021/04/19)
Useful Accessories & Shooting Equipment (tbc)
Issues and Flaws (last updated 2020/05/12, tbc)
Technical Specs & Background Information on the XPhase Hard-/Software (tbc)
Virtual Tours/Panoramas Shot with XPhase Pro S (tbc)
Comparisons with other 360°/DSLR Cameras (tbc)
My RAW Workflow (updated but still tbc)
Recommended 3rd Party Apps & Software (tbc)
Camera Calibration/Stitching Calibration
Xphase 360 Camera FAQ (Frequently asked questions) (tbc)
Where to buy?
http://www.stabilizer-pro.com/c/xphase-cameras-0429
As it ships from China, there may apply some import tax and/or duties depending on the destination country.
Initial Set-Up & Begin Shooting with the XPhase Pro S
Please read the „Tips for Quick Start“ and all manuals provided together with the hard-/software before starting.
Charge, update firmware, get the latest version software/app ready, configure and shoot for the first time. Best to run PanoManager on Windows (in any folder/direction with write access, like root of harddrive) and a capable Android phone (at LEAST 2 GB of RAM, Android 5.1, good chipset and stable WiFi connection, ++). With the app on your smartphone you can only stitch to JPG. For RAW DNG or PNG, please use the Windows/MAC version of PanoManager/PanoCreator. Please note that the USB stick has to be formatted to FAT32 (no matter which size it is – see Recommended Software for a handy program to format SD cards/USB drives on Windows).
The workflow from shooting to final panoramas is not easily understandable if you haven’t done it on your own. Shoot and practice to get a feeling on how the settings and different scenes impact shooting and post processing.
In short (see FAQ for all settings explained):
1) Shooting: Choose between 3HDR/6HDR and your favourite settings (Auto/Manual mode, Tripod/Handheld, shooting parameters, etc.). You can also choose to save the single lens RAW DNGs to a separate folder (ORI+RAW – NOT RECOMMENDED!), what makes saving a lot slower (normal shot: ~15 secs./RAW 1,5 – 12 mins.), so only for special occassions. The cam saves all single lens images as JPGs into an „ORI“ file on the USB drive. 6HDR usually brings more dynamic range and smoother shadows, nearly without noise. But only use it when the camera isn’t moving and you have no or only few moving objects. 3HDR is more handy during shooting (less battery drainage, file size and saving times), but can result in some noise and not that clear images in detail. For outdoor i mostly use 3HDR (with 0 EV or -2/3 EV on sunny days), for indoor mostly 6HDR+ (with +2 EV). Each has it’s own up-/downsides.
2) Stitching: If you have chosen „auto-stitch“ in the smartphone app, your shot will instantly get stitched on your phone to JPG and/or PNO after shooting/saving is complete (blocks the shutter button in the meantime). I only use auto-stitch for first control shots. Better is you plug the USB stick into your PC/MAC and stitch the ORI files there to DNG, PNG (with options like „raw sensor data“ for color or „expansion mode“ for expanded panos, etc.) or JPG with Panomanager. You can now even choose to stitch only single exposures of a 3- or 6-bracketed HDR or other useful options (like scene modes Static or Move, template based-stitching of similar shots „for time lapse“, etc.). So you have many combinations and a lot to think of, even before shooting. The 360° panorama crucial XMP metadata is already added to DNG and JPG files (atm there’s a bug for DNGs not having metadata at version 200508, as workaround you can use JPG stitch to fetch metadata from them).
3) Post processing: I have best results when stitching to DNG and develop the RAW stitched panorama in Adobe Camera Raw/Photoshop. For WB and color correction i use a color checker on the first test shots on scene (datacolor SpyderCheckr 48). Sometimes you can achieve better results by stacking several shots (stitched DNGs) with Kandao RAW+ and develop it then or merge different exposures with HDR software (see FAQ for more information).
GREAT HELP TO START: Check out Ian Tresman’s (updated) Diagram for Operation and Workflow (pdf):
https://www.facebook.com/groups/xphasegroup/permalink/891900367919139/
Review, Samples, Workflow, Tutorial and PTGui stitching template from 360 Rumors
https://360rumors.com/xphase-review
https://360rumors.com/xphase-upgrade-adds-dng-raw-mode-improvements-price-increase
https://360rumors.com/xphase-update-2020-may
https://www.youtube.com/watch?v=ZzBanUIMWeA („TOO GOOD to be true? XPhase Pro review Part 1“)
Find more videos on YouTube: https://www.youtube.com/results?search_query=xphase+pro+
Find more samples (ORI, DNG, PNG, JPG, PNO, etc.) in the FB group.
Facebook Group/Board/Community („XPhase / XPhase Pro Group“)
https://www.facebook.com/groups/xphasegroup
Firmware/Software & User Guides
Download for Windows/MAC OS and Android (not listed on Google Play Store):
https://drive.google.com/drive/folders/1-OXae23cmymYcWUld7OMNlfUyIfr2kVk?usp=sharing
You’ll find the iOS app in the Apple App Store, which is usually behind the Win/Android versions (see FB group for more information on official updates).
Version History
April 19, 2021
Software and Firmware (210419 version)
1. Improve color
2. Improve white balance
3. Support quick preview of un-stitched HDR photos (auto stitch option)
4. U disk can be formatted through APP to repair unrecognized U disk
5. Can view the camera's unique serial number
6. Support for selecting photos on the VR browsing interface
7. Press the camera shutter can also save GPS information
8. Time-lapse photography can choose the first or last one as a template
9. Timer 1 second and 2 second options added
10. The shorter exposure time is displayed as a score

May 9, 2020
Software and Firmware (200508 version)
1. The scene mode can be selected in the stitching setting menu to optimize the HDR synthesis algorithm. The motion mode is the previous default mode, which is suitable for the movement of objects in the scene, which can reduce ghosts caused by HDR synthesis, but may cause corrosion in areas where the brightness changes strongly; the static mode is a new mode, suitable for situations where the scene is completely still, Can avoid corrosion in areas where brightness changes strongly.
2. Support removing thermal noise from long-exposure photos: In manual mode, take a normal shot with 3 exposure HDR modes, then wrap the camera with the cloth cover in the attachment and cover the bag mouth to ensure no light leakage, and use the same parameters take another picture. Select these two ORI files, and select "Remove noise and stitch" in the stitching menu to remove the thermal noise of the first photo from the thermal noise information extracted from the second photo.
3. Support gyroscope calibration to make the horizontal correction more accurate: first turn off the “level” in the stitching menu, adjust the camera angle to make the panoramic photo taken completely horizontal, keep the camera still, select "Setup" in the "Level Correct" of the shooting menu, use the App to control the camera to take another picture, and the calibration of the gyroscope is completed.
4. Support continuous shooting at a fixed interval: Set the shooting interval in "Time Lapse" in the shooting menu, click the App's shooting button to start continuous shooting. Press the camera shutter for more than 1 second to terminate continuous shooting. To prevent the camera from overheating, the exposure time for continuous shooting in manual mode is limited to 1/4 second. In addition, when the exposure time is long or the temperature is high, a longer interval should be set. Overheating the camera will cause more thermal noise and may cause water mist on the lens protection glass. If you want to use a series of photos taken continuously to create a time-lapse photography video, you can select "STITCH FOR TIME LAPSE" under the stitching menu, and the software will use the template extracted from the last photo to stitch all the photos. Doing so will reduce mutations in adjacent photos, but will result in more seams.
5. In the stitching menu, select "TO DNGs OF EVERY EXPOSURE" to generate panoramas in DNG format for each exposure.
6. Select "TO DNGs OF EVERY LENS" in the stitching menu to convert the ORI file into separate DNG format photos for each exposure of each camera.

April 12, 2020
Software and Firmware (200412 version)
1. Fixed a bug of HDR synthesis
2. Improved stitching of bottom
3. Added GPS information to DNG
4. Fixed the bug that jpg file in ios has no Exif
5. Prioritized the latest photos in the album
6. Fixed bugs in PNO2JPG and JPG2PNO

February 9, 2020
Software and Firmware (200304 version)
1. Improved color issues in shadows
2. Add luminance options of stitching output
3. Add contrast options of stitching output
4. Add gamma options of stitching output (gamma B increase the brightness of shadows)
5. Removed streaks from JPG output on PC/MAC
6. Add a Camera Calibration Tool for PC and MAC
7. Add options to enable users to use the parameters of the last phone control shot when pressing the camera shutter
Note: the calibration tool requires invitation code to sign in the Panomanager, customers already have invitation code and already sign in can skip this step, customers who needs invitation code, please PM Danny Wong on Facebook, thank you!

February 9, 2020
Software (200209 version)
1. This new version includes support for MAC
2. This version fixed color related issue of previous version
3. The firmware is the same as 200202 version, please only update softwares

February 3, 2020
Software (200203 version)
This new version fixed the crash bug of 200202 version
The firmware is the same as 200202 version, please only update the software/app

February 2, 2020
Software and Firmware (200202 version)
This version fixed DNG color bug of 200120 version

January 21, 2020
Software and Firmware (200120 version)
1. Support level correction using a gyroscope
2. Add "-5EV~+2EV" (-5EV, -3EV, -1EV, 0EV, +1EV, +2EV) option to HDR6 mode
3. Support outputting real raw DNG for each camera (Need to use SanDisk U disk, using Toshiba U disk will make storage speed very slow)
4. Support GPS meta tagging
5. Add "BEST" option to jpeg quality (YUV444 and quality 95)
6. Reduce color unevenness
7. Improve gamma curve for jpg to reduce blow out
8. Improve stitching in low light
9. Fix a bug that ori file larger than 500M could not be stitched
10. Fix a bug that could not be deleted in batches on ios (ios will be updated soon)

December 18, 2019
Software and Firmware (191218 version)
1. Improved color processing: Reduces color unevenness in certain light and reduces glare
2. Changing or saving default settings
3. Provide visual confirmation of the shutter press and exposure complete
4. Allow the Panomanager app to be connected/reconnected to the camera without pressing the shutter button
5. Provide more option of dynamic range: from -2EV ~ +2EV to -3EV ~ +3EV
6. Add an option to stitch without HDR merging (e.g. only stitch -1EV)
7. Indication of used shooting options in the apps
8. Add an option to avoid streaks caused by stroboscopic light sources such as fluorescent or incandescent lamps (50 or 60 Hz)
9. Add XMP tags to DNG file

November 26, 2019
Firmware (1126 version)
This new version fixed color issues in low light conditions

November 13, 2019
Software and Firmware (1113 version)
This new version fixed the DNG bug, adjusted the Gamma in JPG output, fixed color issue of dark area.

November 7, 2019
Software and Firmware (1107 version)
This new version fixed the bug of 1031version, optimized stitching algorithm, DNG has been disabled for now, will enable in next few days after fixing

October 31, 2019
Software and Firmware (1031 version)
This newest version update Auto Mode 6shot HDR and DNG Raw output

October 25, 2019
Software and Firmware (1025 version)
This new version comes with 6shot HDR

September 27, 2019
Software (0927 version)
This new version fixed stitching errors and turned off the auto-stitching function

August 28, 2019
Software and Firmware (0828 version)
This new version improves photo stitching, please make sure to update both the camera firmware and softwares
All version information was posted by Danny Wong on the public XPhase Pro Facebook group (https://www.facebook.com/groups/xphasegroup/announcements).
Useful Accessories & Shooting Equipment
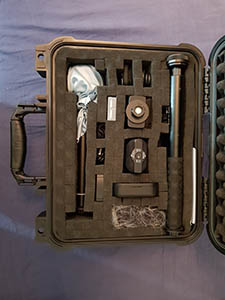
- Rainproof Case* – all-in-one
- Charging on-the-go 😉
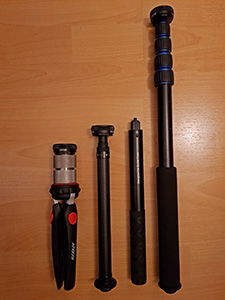
- Monopods/Selfie Sticks/Weights…
– USB WiFi repeater (recommended for much higher range, check for a cheap black one with foldable antennas, better than Xiaomi to set up and run)
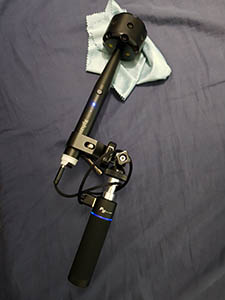
– Power bank (to run the repeater or charge the XPhase between shooting). Check out the Feiyu Tech charging handle for charging while shooting (you’ll need a clamp and screw adaptors, see image above)
– Charging cables and spare parts (original bottom caps, cables and lens protective glasses can be purchased at stabilizer-pro). You can also use spare cables with DC 3.5 mm x 1.3 mm, 2 A (ebay, Amazon, etc.)
– *Waterproof hardcase (approx. 35 x 29,5 x 15 cm). Fits XPhase Pro S, RAVPower AC750 filehost/repeater/power bank, Richer-R WLAN Repeater, charging cables in different lengths, remotes and adapters, USB sticks and micro sd cards, YI 360 VR camera for quick 360° videos, Zoom H2n Spatial Audio Recoder incl. windshield, Feyutech Handle Charger, Andoer Monopod Stand incl. 2-3 x 200 g SMALLRIG weights, Insta360 Invisible Selfie Stick, Insta360 Carbon Selfie Stick, Zhiyun Quick Setup Kits, Lenspen MiniPro III, a lot of stickers on the sides and of course some desiccant packs (moisture absorber) 😛
– „Xphase Pro S Extended Battery„: „Xphase Pro S camera extended battery, length: 245mm, width: 25mm, 6800mAh, continuous working time 3hours. (Camera standard built-in battery is 3400mAh, continuous working time 2hours)“ ($79)
– Best tested USB stick so far: LEXAR JumpDrive S47 (Sandisk UltraFit old version, Toshiba TransMemory U364)
– Color checkers & greycards (for your perfect RAW workflow): Check out X-Rite ColorChecker Passport Photo 2, Datacolor SpyderCHECKR 24 or SpyderCube
– Monopods, poles, weights, stands, 360° lighting solutions, quick-release adapters, etc. will follow
USB sticks/thumb drives:
Saving times (first beep to two beeps, same conditions and settings, camera covered with a slightly transparent cloth, ORI+RAW for 3/6HDR, one minute cool-down between shots).
Lexar S47 3119W 128GB: 1:25 / 2:40 mins
Sandisk SDCZ43 128GB: 5:06 / 10:35 mins*
Sandisk SDCZ43 64GB: 1:24 / 2:40 mins
After the Lexar testing the Sandisks the whole camera heated up like hell pretty quickly and i ended up with fogged lenses (for the first time for months). The battery indicator became red. After cooling down and starting again, it’s green (it was fully charged before the test).
*The weird long saving times with my 128GB Sandisk may indicate a faulty drive, so these times are not reliable.
tbc (you can check the FB group for great tips, meanwhile)
Issues and Flaws (last updated 2020/05/12)
Firmware/Software/Processing:
1) Dodged black and white points in the camera’s unstitched JPGs from each lens (not using full range of 255 values). Color shift from center to edges in the unstitched JPGs (vignetting causing „color blobs“ on final panos) -> Magenta/green color blobs on final output
2) Issues with 3 and 6shot HDR bracketing (EV steps are not thought well, sometimes bracketfail)
3) „Stripe pattern“ on stitched JPGs (according to Danny Wong this is from the JPG engine/compression artefacts, they will try to use another engine in future updates)
4) „Auto Leveling“ is not working precisely (Gyroscope can be calibrated since 200508 app version)
5) No real stitched RAW output (stitched DNGs are generated from JPGs)
Hardware:
1) My unit suddenly gave up and stopped shooting (only 4 beeps), had to be replaced
2) Lagging when shooting several shots right after another (perhaps due to overheating SoCs or USB storage – unconfirmed)
3) Sometimes some shots in a row are not saved correctly (perhaps due to overheating or as Danny Wong says „USB connection to the drive got loose“)
4) Hot pixels from right after starting the camera (even at 0° C) that ends in a „starry sky“ all over the panorama when shooting longer exposures (tested Manual Mode, ISO 100, 3.2 – 8 sec., 3HDR). Since the 200508 version there is an option to substract hot pixels when stitching (so it’s solved)
5) Lenses fogging up from inside the camera what makes shooting impossible (Silica Gel packs inside the storage case can help to avoid this, see FAQ)
6) Some reporting weak WiFi signal (improved WiFi on the 2020 version of the camera)
7) Bottom part with male screw is made from plastic (hygroscopic Nylon), gets loose over time and is a weak point to break (got improved with metal on the new 2020 version of the camera)
8) Heavy lens flare on bright light sources (caused by the coating/filter of the lens glasses)
9) The camera cannot be charged while mounted (3.5mm charging port is under the bottom cap) -> Got improved with outside micro USB connection on the new 2020 version of the camera
tbd in more detail (you can check the FB group for more information, meanwhile)
Technical Specs & Background Information on the XPhase Hard-/Software
Sensors: OmniVision OV8865 Color CMOS 8 MP (3264×2448) Image Sensor with OmniBSI™-2 Technology, 1.4-micron, 30 fps, Automatic black level calibration (ABLC), Static defective pixel canceling, Supports output format 10-bit RAW RGB (MIPI), Supports horizontal and vertical sub-sampling
Chipset/SoC: HiSilicon „Hi3519 V100“ with Cortex-A53s*
Interfaces: USB 2.0, WiFi 2.4 GHz
Battery: 3400 mAh, Li-Po
Power supply: DC 3.5 mm x 1.3 mm, 2 A
Optics/lenses: Lens glasses with coated „lens protective glass“ („The AR coating on the protection glass of Xphase Pro S lens is different from Ocam, but it nearly not affect the glare, the glare is mainly affected by the lens and IR filters.„). Lenses, (IR) filters and coatings not known.
Focal Length: 3.85 mm*
Horizontal Field of View (HVoV): 44.5° (FOV: 68°)*
Focal length multiplier: 7.6*
Sensor size: 1/3.2 inch / 4.54 x 3.42 mm (diagonal: 5.68)
Dynamic range (EV compensation): -3 EV ~ +3 EV
Bracketing in HDR modes:
– 3HDR: -2, 0, +2 EV
– 6HDR: -3, -2, -1, 0, +1, +2 EV
– 6HDR+: -5, -3, -1, 0, +1, +2 EV
Fastest shutter speeds: 1/15000 sec. (~1/3840 sec. = 0,00026s for middle shot)
Longest exposure time (3HDR mode): 8 seconds (for each exposure)
Xphase Software and Apps: PanoManager (WIN, Stitching), PanoCreator (MAC, Stitching), Xphase (Android, Shooting & Stitching to JPG), Xphase (iOS, Shooting & Stitching to JPG), RoamingCreator (WIN, Creating Virtual Tours) and others (Viewer, PNO2JPG, Calibration Tool, etc.)
*According to user findings
(tbc)
Virtual Tours/Panoramas Shot with XPhase Pro S
Vernissage/Exhibition „MUNICH POP ART“ at köşk, Munich, Germany
Tollwood Winter Festival 2019, Munich
Grafitti Artworks & Mercedes Benz (Car Advent Calendar), Donnersbergerbrücke, Munich
Christmas Market 2019 on Munichs Marienplatz
View over Munich (from New Town Hall Tower), 16K 3HDR handheld on a pole
MUCBOOK Creative Night (MCBW 2020) @ HFF München (FW/SW 200304)
Night time shots of Munich City (April 2020, „München sagt Danke“), before „Static“ option was provided
(tbc)
Comparisons with other 360°/DSLR Cameras
– One shot zoomed in comparison with Ricoh Theta Z1 by Jimmy Munro
– One shot comparison with Xiaomi Mijia Mi Sphere, Kandao Qoocam 8K and insta360 One X by Fabian Ruyters
– XPhase Pro Review: DSLR-level 360 camera for VIRTUAL TOUR (+ comparison vs Theta Z1) by 360Rumors
– Indoor comparison with 200412 FW and Theta Z1 / Qoocam 8K by Christiaan Roest
Many more can be found in the FB group.
My RAW Workflow
Shooting tips for various scenarios, stitching to DNG, stacking/merging different 3/6HDR DNGs or even DNGs of single exposures with your own choice of software like Kandao RAW+ or Photomatix HDR, developing in Adobe Photoshop/Camera Raw or Lightroom, leveling/straightening if needed, final denoising/sharpening if needed, nadir patch, inject 360° EXIF information/XMP metadata if needed and other enhancements.
My basic tips: Shoot -1 EV underexposed (depends on the light sources) to preserve hightlights and work with the DNGs. The FW/SW improves with every update and it’s not always neccessary to underexpose anymore.
My way to go:
- Take test shot(s) and preview stitched JPGs or even easier PNOs on your smartphone
- Shoot with right settings (first shot for every new scene/light situation/exposure/room should be with a color checker chart to get WB and colors right)
- Stitch all shots to JPG on a PC to preview and to easily read out shooting settings from metadata/exif (you can delete the „pno“ files)
- Stitch all chosen shots to DNG for all further steps (you can delete the „inf“ files)
- Create color profile for each scene/room/etc. from the color checker shots (DNG to TIF, follow your color checkers manual)
- Develop first good picture from scene with color profile and all further adjustments in ACR and overwrite/save as new preset
- Develop each scenes DNGs with the created preset(s) (and adjustments like white/black points), save as TIF
- Denoising/sharpening/detailed editing/nadir & zenith patching if needed (remain file format TIF until saving final output or PNG if you’re working in the 3D mode of Photoshop)
- Save to all formats/resolutions you want (for Facebook use JPG and lower the quality to keep under 30 MB file size; for virtual tour software TIF or PNG in high quality)
- Inject 360° Exif information (use Exif Fixer or exif_adder.bat) and other metadata (copyright, GPS, etc.) if needed. At this point, i only keep the developed TIF and final social media JPG. The DNG can be stitched again from the ORI at a later point, if needed
tbc (you can check the FB group for great tips, meanwhile)
Recommended 3rd Party Apps & Software
Android: edit360 (leveling), Tiny Planet FX Pro, Snapseed, TouchRetouch (nadir editing)
iOS: Please comment any apps here (fb group). It would add great value!
Windows: Hex Editor Pro (to unpack 6shot ORIs), Kandao RAW+, Photomatix Pro (HDR software), Exif Fixer, FAT32 Format, RAWTherapee (RAW DNG processing), Adobe Photoshop (Adobe Camera Raw), GoPro VR Player (360 degree playback and tiny planet/2D shot extraction for PC/Mac), Exif Pilot (for advanced metadata editing)
Virtual tour creation: Pano2VR Pro, 3DVista Virtual Tour Pro, kuula (web-based), Panotour Pro (discontinued)
tbc (you can check the FB group for great tips, meanwhile)
Camera Calibration/Stitching Calibration
XPhase Re-Calibration FAQ
Q: Which camera need calibration?
A: Not every camera needs calibration, only the below two conditions needs calibration:
1. Cameras have stitching errors after long time international transit shipping (the bumps during transit may cause stitching errors)
2. Cameras have stitching errors after firmware updating.

Q: How to take calibration photos
A: Please follow the instructions below (standard 14 photos)

Q: What to do if the buildings around are not high enough?
A: In this condition, please take 26photos totally instead of 14. In step one, please take 10 photos instead of 6, in step two and three, please take 8 photos instead of 4.

Please follow below to take standard calibration photos (14 photos):

Tips before shooting:

1. First of all, please find a place which is about 10 meters distance from high buildings (please make sure all 14 pcs photos taken can include high buildings as reference substance) and make sure not many people or cars around. kind of center garden with no people around will be the best.

2. When you take photos, please stay about 1 or 2 meters away from the camera and better not move around (or hide).

3. Step 1 is to rotate the camera horizontally (each rotation is 60 degree), Step 2 and Step 3 is to rotate the camera vertically (each rotation is 90 degree).

4. Please shoot in 3shot HDR

There are 3 steps of taking calibration photos:

Step 1 (refer to the Video 1 https://www.youtube.com/watch?v=syje63dFTFk)

Please mount the camera as shown in the video 1, take one photo and then rotate the camera horizontally about 60 degree, take one more photo and repeat, it means to take one photo in every 60 degree rotation, totally take 6 photos in total 360 degree rotation

Step 2. (refer to the Video 2 https://www.youtube.com/watch?v=pqQnjBjld30)

Please mount the camera as shown in the video2: take one photo and then rotate the camera vertically about 90 degree and take one more photo and then repeat, it means to take one photo in every 90 degree rotation, totally take 4 photos in total 360 degree rotation

Step 3. (refer to the Video 3 https://www.youtube.com/watch?v=pAkAx_rraGs)

Please mount the camera as shown in the video 3, take one photo and then rotate the camera vertically about 90 degree and take one more photo and then repeat, it means to take one photo in every 90 degree rotation, totally take 4 photo in total 360 degree rotation

You will get totally 14 calibration photos.

---------------------

How to use calibration tool:

Step 1. Please use the invitation code to register in Panomanager (refer to Xphase Panoroma Manager User Manual page 21). Ask Danny Wong on Facebook for the invitation code, then register*.

Step 2. Open the calibration tool in the Xphase Pro folder, input the ID and password.

Step 3. Click "add Ori files" button, select all the calibration photos Ori files (please refer to another post about how to take calibration photos) Click the "open" button in the lower right corner.

Step 4. Click "start calibration" button, the progress bar will show the processing status.

Step 5. Wait for a while, there will be a dialog box show up, choose a folder and then click "choose folder" button (it’s for saving the calibration software)

Step 6. Open the folder which saved the calibration software, copy the CameraConf_800 to the USB root.

Step 7. Power on the camera, and then power off. Check if the CameraConf_800 has .updated suffix show up, if yes, the calibration is successfully.

*When register in Panomanager with invitation code, please make sure to click "send" button on the next page and wait for a while, you will receive the verification code by email.

---------------------

The ChangeCameraConf.exe program has been uploaded to the Google drive link for re-calibration of older shots (ORIs).

How to use
If you need to re-stitch the old photos after you calibrate the camera, please follow the below steps:

1. Please put the Ori file(s) (old photos), calibration software (CameraConf_800) and the Changecameraconf.exe in the same folder

2. Double click Changecameraconf.exe, the Ori files can be re-stitched.

[posted by Danny Wong on the Xphase Facebook group and slightly modified]
Xphase 360 Camera FAQ (Frequently asked questions)
- The lenses are fogging up from inside while shooting:
Make sure not to shoot in ORI+RAW mode (just use „ORI“). Store the camera in a sealed case together with silica gel packs if not in use. If you still see fogging, in 6HDR mode, let the camera cool down at least 60 seconds between the shots, in 3HDR mode 30 seconds. - The app/camera seems to freeze after each shot/shooting takes enormously long:
Don’t shoot in ORI+RAW mode, use ORI mode instead. You won’t get any good results from the single lens RAWs, either. - Is there an API available for the Xphase?
Yes, for Windows. Please contact Danny Wong (sales@stabilizer-pro.com) for more information. - Is it possible to do my own HDR blending with stitched DNGs?
Yes, since the 200508 version you can select stitch „To DNGs of every exposure“ to get 3 DNGs out of a 3HDR shot or 6 of a 6HDR (as it says „of every exposure“) with template-based stitching (see point 5). - Is it possible to stack several panoramas with 3rd party software (e.g. Photoshop or Kandao RAW+)?
Yes, since the 200508 version you can select „Stitch for time lapse“ to get equally stitched DNGs for blending/stacking them. In this mode they will be stitched based on your last selected shot of the row („template based stitching“). Otherwise every panorama will be stitched individually and stitching will differ from shot to shot, even if the scene hasn’t changed („optical flow stitching“). - What do all the settings mean? How does your setup look like in most cases?
First, i always try to use a monopod/tripod to keep the camera as steady as possible. Inside the app i set the following:
Gear icon (upper right corner – only relevant for stitching directly on the phone to PNO or JPG)
Auto Stitch: No (Perhaps only for the first one/two shots to check exposure)
Mode: PNO (If using Auto Stitch it saves time and memory not to stitch to JPG, too)
HDR Select: HDR Merge (You can also set it to output only single exposures of a 3/6HDR shot)
Quality: Best (Stitched JPG quality)
WB: Auto (Stitched JPG White Balance setting)
Lumincance: +5
Contrast: +3
Gamma: B (B ramps up the shadows in the stitched JPG)
Scene: Static (Should be used in most cases, only change if you shoot a lot of moving objects)
Logo: None (Here you can activate a nadir logo of your choice, logo can be changed when updating firmware)
Level: Yes (Auto Level the panorama based on the gyro data when stitching)
Shooting settings (lower right corner)
Timer: 0 Sec (Set a self-timer if needed)
Mode: Auto (Auto exposure with EV control only or set to Manual for shutter speed and ISO control)
HDR: 3(-2~2EV) (In most cases 3HDR gives best results. Use 6HDR for better detailed bright light sources for example)
Anti-flicker: Close (Can be set if you get banding from artificial light sources)
Time Lapse: Close (Set a time lapse shooting interval – stop time lapse shooting pressing button on camera for 1 second)
Output: ORI (At this point it makes no sense to shoot ORI+RAW in my opinion)
Use GPS: Yes (Saves GPS coordinates from phone into the metadata of your shot)
Cam Button: Last (To keep last used settings when shooting via the button on the camera)
Level Correction: Can be used for calibrating the gyro and saving level information into the shot
Scene: Tripod (longer exposure and ISO 100 in Auto Mode – Handheld means shorter exposure but higher ISO)
EV: 0 EV or -2/3 EV (EV compensation for Auto Mode)
Speed: Set the shutter speed for Manual Mode
ISO: Set the ISO value for Manual Mode - How should i proceed after shooting to get best results?
Unplug the USB stick from the camera, plug it into your PC or MAC and stitch the ORI files with PanoManager (on MAC PanoCreator) to DNG. Here you can set all values when clicking on the upper right gear icon. Develop the stitched DNGs with a RAW processor of your choice (e.g. Adobe Camera RAW, Affinity Photo, Oloneo Photoengine). In the meantime you can charge your Xphase. Make sure to keep a backup of your ORI files, so you have the original shooting data (to eventually render out a new DNG at some later point). I move the ORI files to a hard drive for backup and keep the stick empty. After processing all RAW DNGs and saving them to TIF, the DNGs are getting deleted to not waste memory. If you encounter weird behaviour of the USB stick at some point, re-format it to FAT32. Just to be on the safe side, i keep some spare USB sticks in my hard case (freshly formatted ones and one with the latest FW to reset the camera on site, if needed) as well as a power bank and charging cable. And you’re ready for the next shots! - How should i take care of my XPhase camera?
Cover the camera head with a microfiber cloth and store in a sealed hard case (together with silica gel packs to keep it dry) when not in use. Always keep your lenses clean (i use a Lenspen MiniPro III – fits perfectly). It’s not recommended to keep it connected to a power source for a long time, this could harm the battery. Just handle it with the caution you would handle any other fragile camera. - How is the camera handling noise?
In 3HDR mode there can be some noise in brightened up shadows, but it’s not that bad. In 6HDR there is nearly no noise, super smooth even in dark shadows. If you have moving objects, there will be noticeable noise on them, as those parts usually only consist of one image out of the exposure series. In 3HDR mode there can also appear a fixed pattern noise. It wasn’t there for some time and came back with one of the latest updates i think. I hope they can/will fix it again.
…more will be added soon!
Thanks a lot to Andrew Dodd, Dean Zwikel, Ian Tresman, Michel Mendes, Michael Ty, Giorgio Marchetto, Fabian Ruyters, Jimmy Munro and many others for their help making this article possible!
